> For a complete documentation index, fetch https://docs.voximplant.ai/llms.txt
# Android: Push notifications
This article will help you to set up push notifications in **Android applications**.
VoxImplant push notifications for Android are based on [FirebaseCloud Messaging (FCM) platform](https://firebase.google.com/docs/cloud-messaging/) and implemented as "[message types](https://firebase.google.com/docs/cloud-messaging/customize-messages/set-message-type)". With the help of notifications, a device can be awakened to show a new message in the user’s conversation(s) and an app can be started before a call arrives.
*Push notifications for calls are sent with high priority and delivered without delay.*
The following guide explains the code needed to handle push notifications and describes additional steps that should be performed to have a working Push Notifications solution for your mobile applications.
Before you start, please check that your project meets FCM [requirements](https://firebase.google.com/docs/cloud-messaging/android/client#before_you_begin).
## Add Firebase to the Android project
To add push notifications to the Android project, it is required to add Firebase to the project.
Follow the FCM instructions and recommendations to:
* [Create a Firebase project](https://firebase.google.com/docs/cloud-messaging/android/client#create_a_firebase_project)
* [Register your app with Firebase](https://firebase.google.com/docs/cloud-messaging/android/client#register_your_app_with_firebase)
* [Add a Firebase configuration file](https://firebase.google.com/docs/cloud-messaging/android/client#add_a_firebase_configuration_file)
* [Add Firebase SDK to your app](https://firebase.google.com/docs/cloud-messaging/android/client#add_firebase_sdks_to_your_app)
* [Edit your app manifest](https://firebase.google.com/docs/cloud-messaging/android/client#manifest)
The Voximplant Control Panel allows you to add only one certificate of one type. If you are developing an application and need to test push notifications in both Debug and Release modes, add the same GOOGLE certificate with your application bundle + specific suffixes, for example, “.dev”, “.prod”.
The Voximplant Cloud does not validate the bundle id, we use this parameter here only to identify the certificate needed to send a push notification. So, you don’t need to change the real bundle id, but only “mark” it for the Voximplant Cloud.
Do not forget to initialize the SDK correctly for Debug and Release configuration and set the suffix of the bundle id depending on the configuration.
## Modify your VoxEngine scenario (for calls)
To let the Voximplant cloud send push notifications to applications, the JavaScript scenario that initiates a call should include a push notification helper:
```javascript title="Add a push notification helper"
require(Modules.PushService);
```
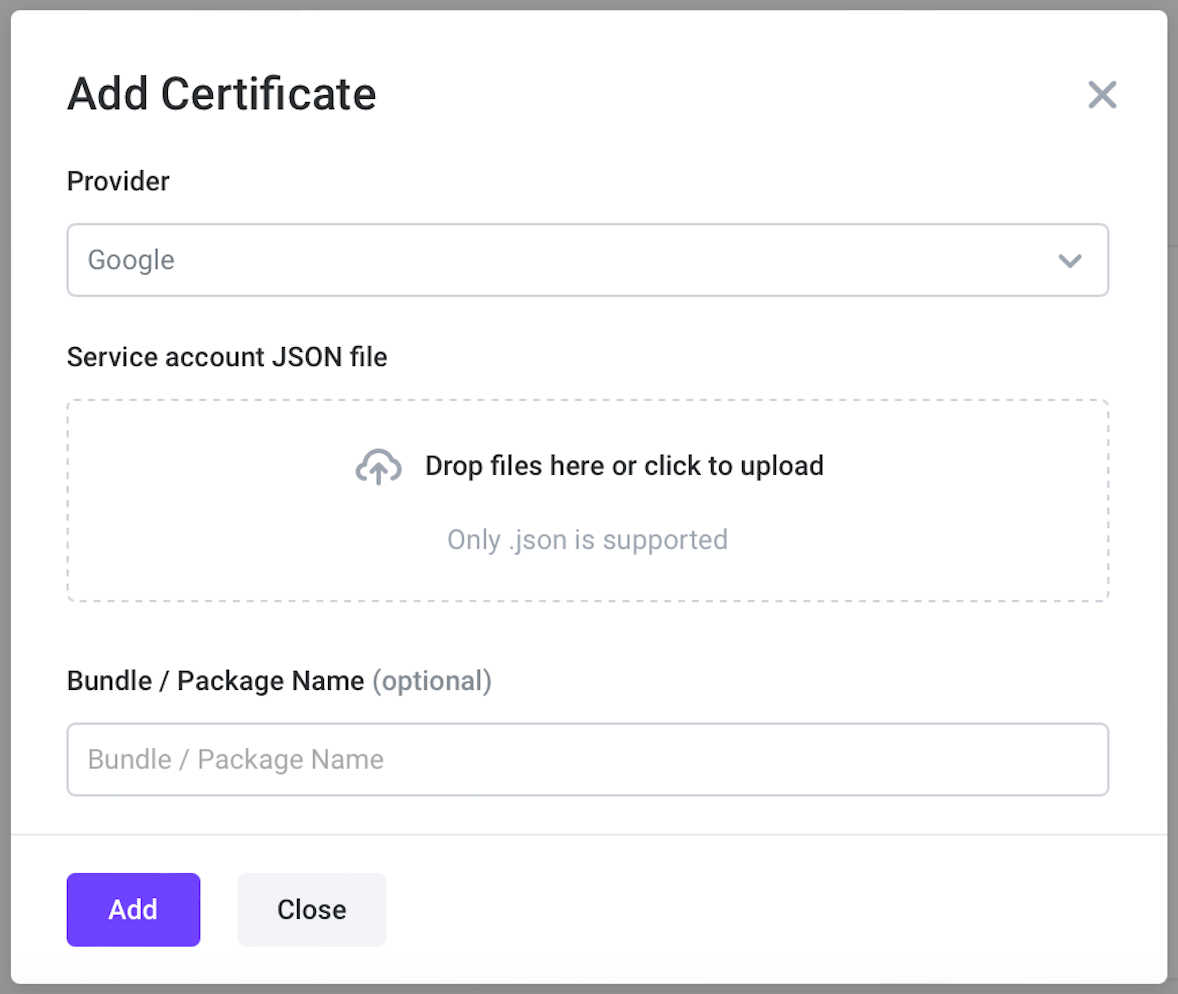
## Add certificates to the Voximplant cloud
1. Log in to the [Firebase console](https://console.firebase.google.com/) with the Google account you have connected earlier in this guide.
2. Go to **Project Settings**.
3. Navigate to the **Service Accounts** tab.
4. Navigate to Google Cloud console by clicking “Manage service accounts permissions”.
5. Generate a key for the firebase-adminsdk account.
6. Log in to the [Voximplant control panel](https://manage.voximplant.com/).
7. Go to your [application](https://manage.voximplant.com/applications), then switch to the **Push Certificates** tab.
8. Click on the **Add Certificate** in the upper right corner.
9. Select **GOOGLE** from the **Certificate for** list.
10. Upload **Service account JSON file**.
11. Click on the **Add** button.
The Voximplant Platform supports sending push notifications to several Android applications with different package names within the same Voximplant application.
If it is required to add several FCM certificates to the same Voximplant application, you have to set the application package name while adding the certificate.
If a package name is specified with a certificate, you should set the same package name when initializing the SDK.
```java title="Android"
ClientConfig config = new ClientConfig();
clientConfig.pacakgeName = getPackageName();
IClient client = Voximplant.getClientInstance(Executors.newSingleThreadExecutor(),
getApplicationContext(),
clientConfig);
```
```kotlin title="Initialize the SDK with a package name"
val client = Voximplant.getClientInstance(
Executors.newSingleThreadExecutor(),
applicationContext,
ClientConfig().also {
it.packageName = packageName
}
)
```
## Provide a token to the Voximplant cloud
The Voximplant Cloud requires a device token to send a push notification.
The token should be obtained from Firebase API on the application side and registered via [IClient.registerForPushNotifications](https://voximplant.com/docs/references/androidsdk/client/iclient#registerforpushnotifications) API:
```java title="Android"
FirebaseInstanceId.getInstance().getInstanceId().addOnCompleteListener(task -> {
if (!task.isSuccessful() || task.getResult() == null) {
return;
}
String token = task.getResult().getToken();
client.registerForPushNotifications(token, new IPushTokenCompletionHandler() {
@Override
public void onSuccess() {
// The push token is registered successfully
}
@Override
public void onFailure(PushTokenError error) {
// Failed to register the push token, see error for details
}
});
});
```
```kotlin title="Receive the token"
FirebaseInstanceId.getInstance().instanceId.addOnCompleteListener { task ->
if (!task.isSuccessful || task.result == null) {
return
}
val token:String? = task.result?.token
client.registerForPushNotifications(token, object : IPushTokenCompletionHandler {
override fun onSuccess() {
// The push token is registered successfully
}
override fun onFailure(error: PushTokenError?) {
// Failed to register the push token, see error for details
}
})
}
```
[IClient.registerForPushNotifications](https://voximplant.com/docs/references/androidsdk/client/iclient#registerforpushnotifications) API may be called in any [IClient](https://voximplant.com/docs/references/androidsdk/client/iclient) state ([ClientState](https://voximplant.com/docs/references/androidsdk/client/clientstate)), however, the token is registered only after the client logs in.
Register the token in these cases:
* Token has been updated by ``
* Another Voximplant user has logged in on the device
## Monitor token refresh
The application should also provide a token if Firebase refreshes it. Override the onNewToken method of previously extended FirebaseMessagingService and pass a new token to the Android SDK.
```java title="Android"
@Override
public void onNewToken(@NonNull String token) {
client.registerForPushNotifications(token, new IPushTokenCompletionHandler() {
@Override
public void onSuccess() {
// The push token is registered successfully
}
@Override
public void onFailure(PushTokenError error) {
// Failed to register the push token, see error for details
}
});
}
```
```kotlin title="Handle token refresh"
override fun onNewToken(token: String) {
client.registerForPushNotifications(token, object : IPushTokenCompletionHandler {
override fun onSuccess() {
// The push token is registered successfully
}
override fun onFailure(error: PushTokenError?) {
// Failed to register the push token, see error for details
}
})
}
```
## Huawei push notifications
If you detect a Huawei/Honor mobile device, you need to use the HMS (Huawei Mobile Service) for push notifications.
To do so, set the [useHmsForPushNotifications](https://voximplant.com/docs/references/androidsdk/client/clientconfig#usehmsforpushnotifications) parameter to **true**. After that, a push notification token registered via [registerForPushNotifications](https://voximplant.com/docs/references/androidsdk/client/iclient#registerforpushnotifications) sends push notifications with a push certificate of the Huawei provider from the Voximplant control panel.
If you set [useHmsForPushNotifications](https://voximplant.com/docs/references/androidsdk/client/clientconfig#usehmsforpushnotifications) to **false**, a push notification token registered via [registerForPushNotifications](https://voximplant.com/docs/references/androidsdk/client/iclient#registerforpushnotifications) sends push notifications with a push certificate of the Google provider from the Voximplant control panel.
## Handle push notifications
Push notifications as “data messages” are received via the service that overrides **FirebaseMessagingService**. You need to override the **onMessageReceived** method to get the push notification data. The **onMessageReceived** method is invoked in any application state (foreground or background).
We recommend the following process for handling call push notifications:
1. Receive the push notification from Voximplant.
2. Do [connect/log in](https://voximplant.com/docs/getting-started/platform/android) if necessary.
3. Call [IClient.handlePushNotification](https://voximplant.com/docs/references/androidsdk/client/iclient#handlepushnotification) API and provide the data that contains the “voximplant” signature.
4. Re-register the push token.
5. Wait for the [onIncomingCall](https://voximplant.com/docs/references/androidsdk/client/iclientincomingcalllistener#onincomingcall) event.
6. Show the incoming call UI to the customer.
```java title="Android"
@Override
public void onMessageReceived(RemoteMessage remoteMessage) {
Map data = remoteMessage.getData();
if (data.containsKey("voximplant")) {
client.handlePushNotification(data);
}
}
```
```kotlin title="Handle push notifications (calls)"
override fun onMessageReceived(remoteMessage: RemoteMessage) {
val data = remoteMessage.data
if (data.containsKey("voximplant")) {
client.handlePushNotification(data)
}
}
```
[IClient.handlePushNotification](https://voximplant.com/docs/references/androidsdk/client/iclient#handlepushnotification) API may be called in any [ClientState](https://voximplant.com/docs/references/androidsdk/client/clientstate), but to receive an ICall instance of an incoming call, it is required to connect to the Voximplant Cloud and log in. After you do that, the [IClientIncomingCallListener.onIncomingCall](https://voximplant.com/docs/references/androidsdk/client/iclientincomingcalllistener#onincomingcall) event is invoked to provide access to the [ICall](https://voximplant.com/docs/references/androidsdk/call/icall) object.
Starting with Android 15, the system restricts network access for background applications. If the [ClientState](https://voximplant.com/docs/references/androidsdk/client/clientstate) is [Disconnected](https://voximplant.com/docs/references/androidsdk/client/clientstate#disconnected), you must start a foreground service before calling [IClient.connect()](https://voximplant.com/docs/references/androidsdk/client/iclient#connect) and [IClient.login()](https://voximplant.com/docs/references/androidsdk/client/iclient#login). The service must remain active until the connection and login processes are successfully completed.
For a reference implementation of this logic, please check our [Android SDK Demo](https://github.com/voximplant/android-sdk-kotlin-demo). It provides a complete example of managing a foreground service to handle push notifications reliably on the latest Android versions.
Call push notifications are sent automatically. Call the [callUser](https://voximplant.com/docs/references/voxengine/voxengine/calluser) method in the VoxEngine scenario and a push notification is automatically sent to the app. Thus, the app can wake up, connect to Voximplant, log in, and accept the call.
Use an analytics label to monitor push delivery status in real time inside the Firebase console via FCM reporting dashboard.
Just set the [CallUserRequest.analyticsLabel](https://voximplant.com/docs/references/voxengine/calluserparameters#analyticslabel) property for the [callUser](https://voximplant.com/docs/references/voxengine/voxengine/calluser) method in your VoxEngine scenario and monitor the message delivery status.

## Use tokens or keys for better security
Voximplant supports 3 ways of the authorization from SDK:
1. With a username and a password
2. With a username and a token
3. With a one-time login key
Saving the password is not secure, so we would recommend that you use the "token" or "key" approach.
The token is received from an event after a successful login and can be saved and used later instead of the password.
The "login key" approach allows you to completely avoid the use of a password on the client side by offloading it to your backend.